Add A Sales Order |
Top Previous Next |
Hover the mouse over the different menu options. If the cursor changes to a hand (![]() ), then click to go to the subject.
), then click to go to the subject.

![]()
Add a Sales Order
Navigate to Sales Order:
•Go to: Quote / Sales Order > New Sales Order to create a new sales order
•Alternatively, use the Sales Order Lookup form to add a new sales order or edit an existing one.
Configure Sales Order Options
•If you don't want to allocate orders, go to Sales Order Options > Allocation Tab and select Easy (Stock is not reserved).
•Use the Grid Report to remove any unwanted columns from the display.
•You can transfer a quote as well as an invoice to the sales order.
Hover the mouse over the different fields on the form. If the cursor changes to a hand (![]() ) , click to get more information.
) , click to get more information.
Sales Order Menu Bar Explained |
|
Save |
Click Save to save the current Sales Order.
|
Transfer to Invoice |
A Sales Order can be converted into an Invoice when the products are ready to be shipped to the customer.
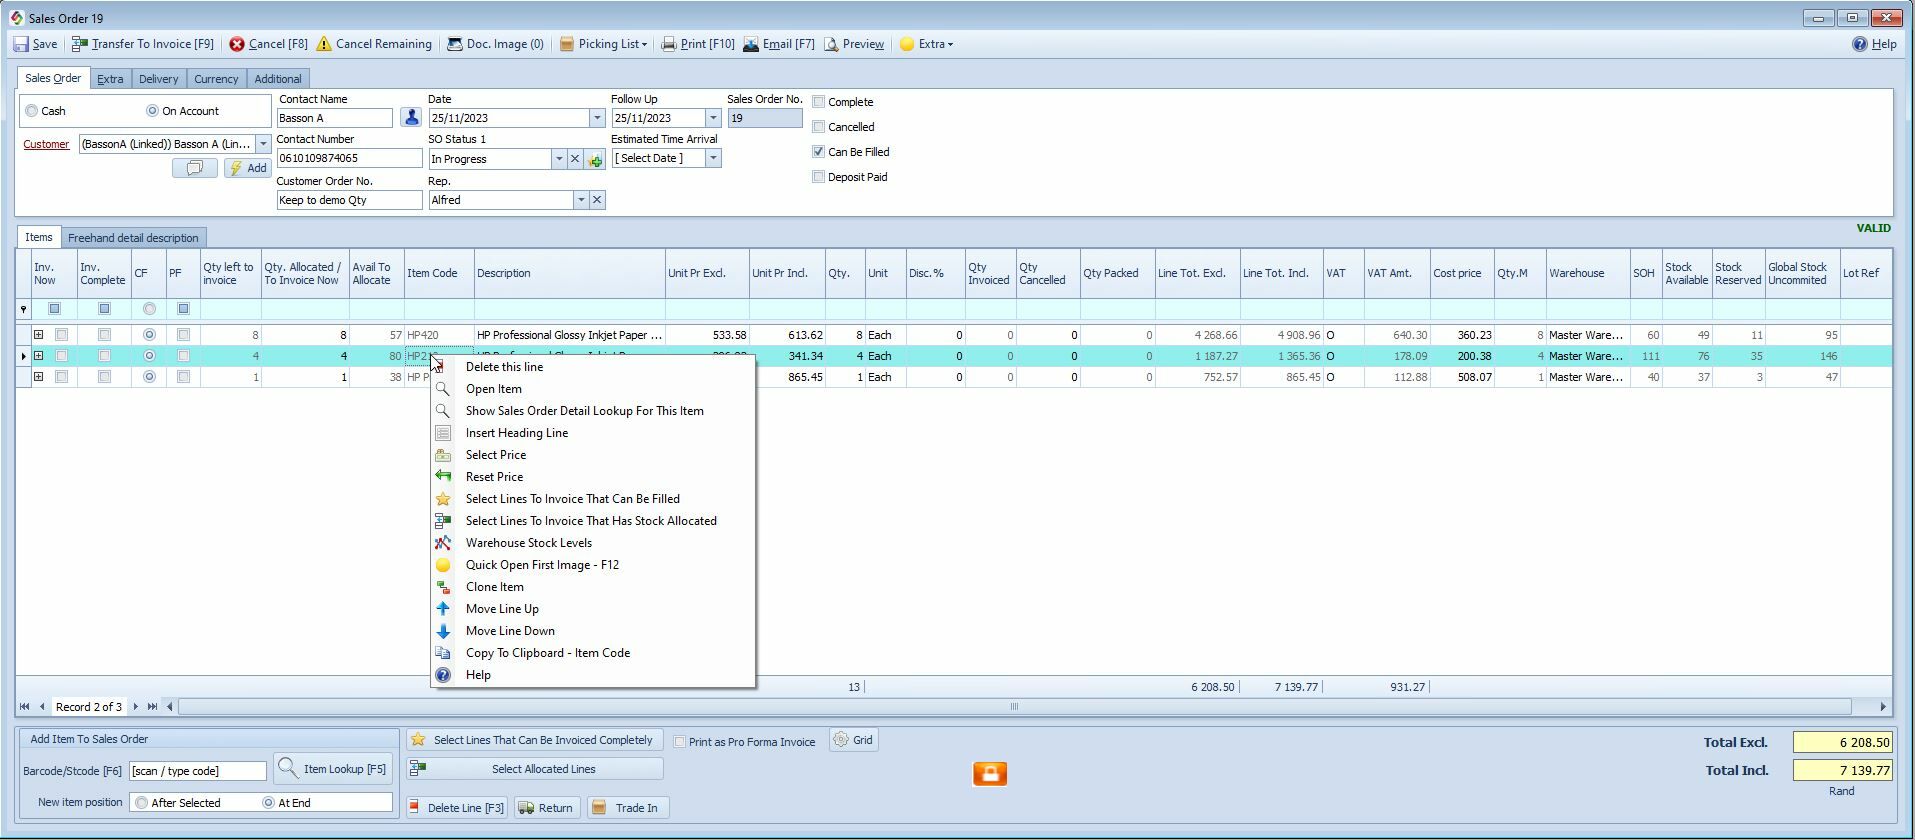
1. Select Items for Invoicing ▪In the Inv. Now column, tick the items to be invoiced. ▪Invoicing can be done in phases as stock becomes available.
Shortcuts & Quick Actions: •Right-click on an item to perform tasks such as: •Delete •Select All Lines That Can Be Filled •Use the Shortcut Buttons for faster processing. (See image above)
Step 2: Transfer to Invoice •Click the Transfer to Invoice button to finalize the process.
|
Cancel |
❌ Cancel a Sales Order To cancel a Sales Order: •Open the sales order, then click Cancel to cancel it.
|
Uncancel a Sales Order |
To reactivate a previously cancelled Sales Order:
• In the Sales Order Lookup form, locate cancelled orders. •Right-click the order, select Open This Order, and click Cancel again to restore it to Active status.
|
Cancel Remaining |
❌ Cancel Remaining Stock Items in the Sales Order Cancels remaining stock items that cannot be filled. These items are deleted, but the sales order won’t appear under the cancelled filter.
|
Doc Image |
You can attach an image, document or file to a Sales Order.
How to Use: •Open the Sales Order. •Click on the Document Image button/icon. •Select the file (e.g., scanned document, signed order, or image) to attach.
This helps with record-keeping, approvals, or visual confirmation of the order.
|
Picking List |
Sales Order Picking List Print or preview the Picking Slip for the sales order.
|
Print, email, or export the Sales Order.
|
|
Email the Sales Order.
|
|
Preview |
Preview the Sales Order before printing or emailing |
|
|
||||||||||||||||||||||||||

Cash vs. On Account |
Choose whether it is a cash paying client or an account paying customer. If the customer does not exist in smart-it, you can then use the |
Sales Order Status You can assign a status to a sales order to categorize different types of orders. This makes it easier to filter and manage orders in the Sales Order Lookup form.
Webshop Integration (PrestaShop) •If you use PrestaShop, the Sales Order Status will sync with PrestaShop when performing a WebShop Sync. •Important: To ensure statuses sync correctly, you must first create them in PrestaShop.
Managing Sales Order Statuses •PrestaShop Users: oPrestaShop has preset statuses that will automatically be added in Smart-IT after your first sync. oTo add new statuses, they must first be created in PrestaShop before they can sync to Smart-IT.
•Non-Webshop Users: oYou can manually add and manage your own statuses within Smart-IT.
|
|
Follow Up |
Follow Up date Choose a date for when you need to follow up on this Sales Order.
|
Estimated Time Arrival (ETA) |
Sales Order Estimated Time of Arrival (ETA) The ETA is the salesperson’s estimated delivery date for the ordered items..
Where to View ETA Information: •In the Item Lookup, salespeople can see when the buyer expects the goods to arrive. •ETA dates for sales orders are displayed in the Sales Order Lookup form.
Setting Up ETA in Sales Orders: •Automatically set the ETA date in Sales Order Options > Sales Order /Default / Required > ETA after x Days. •To make it a required field go to Sales Order Options > Default/Required.
|
Complete |
Show Sales Order as Completed When the final item has been invoiced, the sales order is automatically marked as Completed.
|
Can be filled |
✅ Can Be Filled •Indicates that all items on the sales order are available and the order can be fully processed. •To view which specific items can be filled, open the sales order.
|
Canceled |
❌ Cancelled •Automatically selected when the entire order is cancelled. •Note: This does not apply to partially cancelled orders.
|
Deposit Paid |
•Indicates that a deposit has been made for the sales order. •This box is automatically checked if a Customer Receive Payment is completed and linked to the sales order.
|
Sales Order No. |
Sales Order Number •A unique sales order number is assigned automatically as soon as the sales order is saved.
|
Invoice Now |
Invoice Now Column in the Sales Order •Allows you to select items to be invoiced immediately. •Related to the Allow negative stock override, which permits invoicing quantities exceeding available stock.
|
Invoice Complete |
Invoice Complete •A checkbox in this column is marked when an item is fully invoiced.
|
Quantity Left To Invoice |
Quantity Left To Invoice In The Sales Order •Displays the remaining quantity to be invoiced, either the full amount or what’s left after partial invoicing.
|
Quantity Allocated To Invoice Now. |
Quantity Allocated To Invoice Now In The Sales Order •Shows the quantity allocated for immediate invoicing. •Cannot exceed the Available to Allocate unless Allow Negative Stock is enabled, allowing manual adjustment of this quantity. •If the sales order quantity is changed later, this field updates automatically only if Auto Fill Allocated If Have Unallocated Stock is enabled in Sales Order Options > Allocation Tab. •To reallocate quantities between customers, go to Allocate Stock To Sales Orders.
|
Available To Allocate |
Quantity Available To Allocate in the Sales Order. This will depend among other things on the Allocation Location as set in the Sales Order options. You can set it to either Global or Warehouse. This will determine if the quantiy available to allocate must come from a specific warehouse or from all the warehouses. if you want to be able to allocate quantities that is On Order, enable the Enable On Order allocation in the Sales Order Options.
|
On Order Allocated |
Shows the ordered quantities already allocated in the sales order.
|
On Order Available To Allocate |
Displays ordered quantities available for allocation. This column is visible only if Enable On Order Allocation is enabled in Sales Order Options > Allocation Tab.
|
Can be filled (CF) |
A blue dot appears in the radio button if there is sufficient stock on hand for a specific line item.
|
Pro Forma (PF) |
Pro Forma (PF) column in the Sales Order •Check this box to include items on a pro forma invoice. •Use in conjunction with the pro forma option at the bottom of the form
|
Quantity (Qty) |
Quantity (Qty) Column In The Sales Order •The quantity ordered by the customer. •If sufficient stock is available, the Quantity Allocated to Invoice Now is automatically populated. •Adjust default allocation settings in Sales Order > Sales Order Options > Allocation Tab.
|
Qty.M |
Qty.M Column In The sales Order •Quantity converted to selling units (e.g., ordering a 6-pack of beer results in Qty.M showing 6 single units).
|
SOH |
Stock On Hand. The quantity that is in stock.
|
Qty Invoiced |
Sales Order Quantityty Invoiced: •The quantity already invoiced for the sales order.
|
Qty Canceled |
Sales Order Quantity To Cancel •Enter the quantity the client wishes to cancel, which reduces the Quantity Left To Invoice.
|
Qty Packed |
Sales Order Quantity Packed The quantity packed using the Pack Sales Order option.
|
Additional Notes
•Stock Lookup Form: The Reserved column shows stock reserved for sales orders.
•Stock Allocation: Allocated sales order quantities reduce Available Quantity (SOH - SO).
•Modifications: Sales order details can be edited unless the order is invoiced or canceled.
•Sales Order Options: Refer to this section for settings like allocation preferences and overrides.
http://www.smart-it.co.za/help/sales_order_-_add.htm