Invoice |
Top Previous Next |
Watch the video - Creating and Processing Invoices (Getting Started)
Go to Invoice > New Invoice
Hover the mouse over the different menu options. If the cursor changes to a hand (![]() ), then click to go to the subject.
), then click to go to the subject.

![]()
How to create an invoice
1. Go to Invoice Options and select your default invoice settings
2. To create a new invoice go to Invoice > New Invoice
3. Need more help: Open the manual here Smart-iT Help Manual
Automatically Open the Invoice Form
•Go to Employee > Employee Lookup.
•Select the employee you want to work with.
•Choose between: Open Invoice, Open Only Invoice and Open Only Touch Invoice.
Using the Touch Invoice
•Go to Invoice > Touch Invoice
Hover the mouse over the different fields on the form. If the cursor changes to a hand (![]() ) , click to get more information.
) , click to get more information.
 Printing Shipping Labels
1. If you need a shipping label:
•Go to Invoice Lookup, right-click on the invoice, and select the Invoice Label to print.
2. To print the shipping label automatically:
•Set this option in Invoice Options > Label tab.
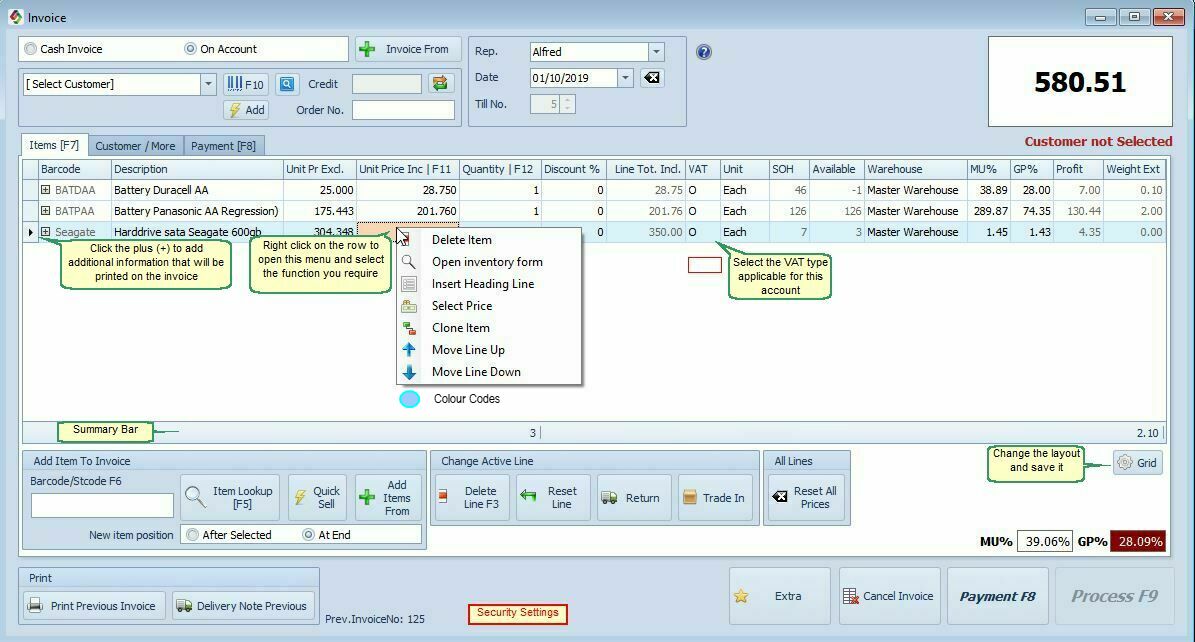
Invoice Menu Fields & Buttons Explained |
|
Cash or On Account |
Cash or On Account•Select between a Cash Invoice and an On Account Invoice. •You can disable either option in Invoice Options.
Changing a Cash Invoice to On Account•When switching from a Cash Invoice to On Account, the program will recalculate item prices. •This happens because the customer may belong to a different price structure. •If you manually entered a price, it may change after the conversion.
To adjust this behavior, go to: Invoice > Invoice Options (see image below).
Setting Default for Job CardsYou can set a default invoice type for job cards in: Workshop > Options tab.
|
Credit Available: |
The amount of credit available will show. If you change the credit amount in the Customer Form press the Refresh Button (
|
Order No.: |
|
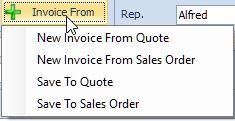
Invoice From: |
This feature allows you to generate an invoice by pulling items from a Quote, Sales Order, or Job Card for a specific customer.
Common Uses
✅ New Invoice from Quote / Sales Order •Use this when you want to generate an invoice directly from a Quotation or Sales Order. •All items from the selected document will be copied to the invoice. •Note: The Quote or Sales Order number is required. ✅ Save to Sales Order •Perfect for retail/shop scenarios where a customer brings multiple items but can't complete the purchase immediately. •Convert the current invoice into a Sales Order for future retrieval. •To store an invoice for later use, save it as a Sales Order. This ensures the customer can return and complete the purchase at a later time.
✅ Save to Quote •Convert the current invoice into a Quote for future retrieval. •To store an invoice for later use, save it as a Quote. This ensures the customer can return and complete the purchase at a later time.
See also the Add Items From button |
Rep: |
Salesperson (Representative) who sold the item. Default Rep. can be set under Invoice Options
|
Invoice Date: |
This feature allows you to use the previous invoice date instead of the current system date when generating a new invoice.
How It Works: •By default, Smart-It assigns the current system date to new invoices. •If enabled, this setting will use the previous invoice's date instead. •You can still change the date manually. To prevent this, use the Invoice Security settings to restrict users from modifying the invoice date. •To correct or change the invoice date afterward, go to Ledger > Corrections.
Where to Enable This Option: Go to Invoice > Invoice Options > General tab to enable or disable this setting.
|
Till No. |
Till no. allocated to this computer. To change it go to Invoice Options and select the Assign Till Numbers tab. |
|
|
Message regarding the invoice: |
See the line below the Amount Field. (Top right hand corner)
|
Payment F8: |
To accept and allocate payments.
|
Process: |
To process the invoice.
|
Cancel Invoice: |
To cancel the invoice |
Add Item to Invoice: |
|
Barcode F6: |
To add an item to the invoice:1. Scan the item barcode or type the stock code or serial number. 2. If you enter only a part of the code, the item lookup will automatically open, and the cursor will be placed in the Barcode column. 3.To specify which column the cursor should be placed in, go to Invoice Options and select the column from the 'Item Lookup Default Column'. |
Item Lookup [F5] |
Click to search for an item.
|
Quick Sell |
Select and add all your Quick Sell items. |
Add Items From |
➕ Add Items From
Use this function to combine items from a Quote, Sales Order, or Job Card onto a single invoice for a specific customer.
When you select Add Items From, the system will: •Prompt you to choose a Quote, Sales Order, or Job Card. •Insert all items from the selected document onto the current invoice, without deleting or replacing any existing lines already on the invoice.
This is especially useful when: •A customer has multiple open documents. •You want to invoice everything at once, even if the documents were created separately.
|
Change Active Line (buttons) |
|
Delete Line F3 |
Deletes the current item you have highlighted. |
Reset Line |
If you change the item's price and / or description on the invoice, you can revert it back to the original by: •Clicking on the Reset Line button to reset a single line. •Clicking on Reset Prices to reset the price. |
Return button |
Return Button When an item is returned, add it to the invoice and select the Return button. ✔ The line item total will now show as a negative amount. ✔ The stock will be returned to inventory.
❖Trade-in Option: Stock items can also be created as a Trade-in item for exchanges or buybacks.
|
Trade-in |
A trade-in is an item bought back from the customer, such as a Coke bottle or a car, etc. Set the item as a trade-in in the Main Stock Form. Invoice Effects: 1. The system will deduct the trade-in amount from the invoice total. 2. Your stock quantity will increase by the trade-in quantity.
Alternative Options: •For return, see the Returns section. •If you do not want to increase your stock, see the Is Discount section.
Disabling Trade-In Button: •Open the invoice form. •Go to security settings and deselect "Returns." This will also disable trade-ins.
A list of trade-in items is displayed on the Extended Lookup and Stock Turnover forms. |
Reset Prices |
Reset Prices on the Invoice If you change the item's price and / or description on the invoice, you can revert it back to the original by: •Clicking on the Reset Line button to reset a single line. •Clicking on Reset All Prices to reset all the prices. |
Options |
|
Show Markup/Profit/GP |
To show or not to show, go to Invoice > Invoice options |
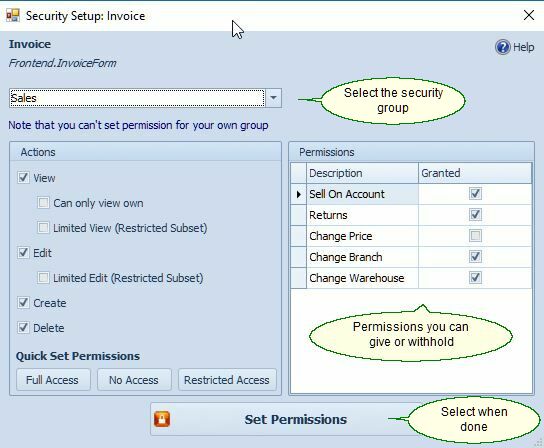
Invoice Security Settings. See also Application > Security Setup