Stock (Inventory) Groups |
Top Previous Next |
Go to: Stock Items > Stock Groups
Watch the video: Creating Stock Groups - Tutorial
Hover the mouse over the different fields on the form. If the cursor changes to a hand (![]() ) , click to get more information.
) , click to get more information.

![]()
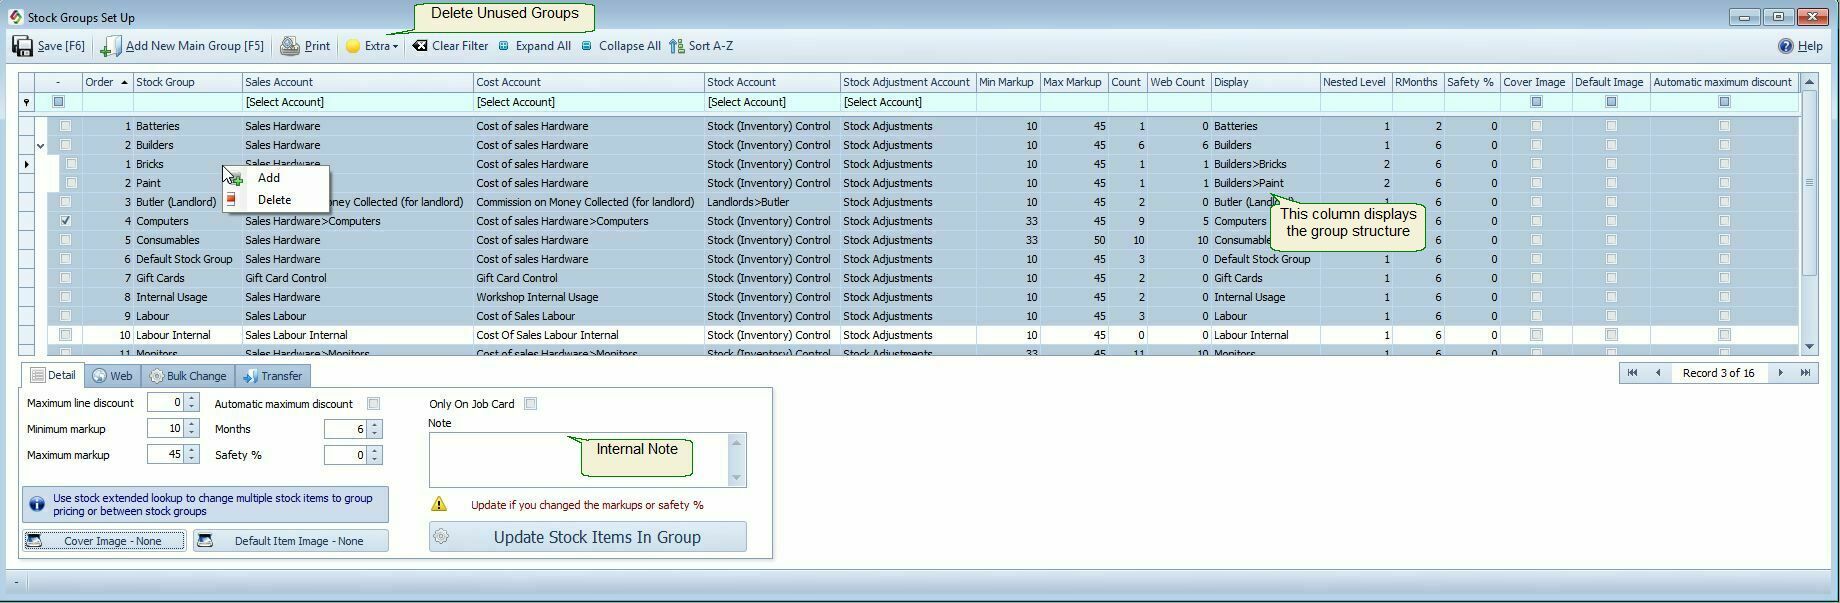
Stock (Inventory) Groups
Stock Groups allow you to organize your inventory into logical categories based on similar characteristics, such as product type, function, or department.
Key Functions of Stock Groups:
•Each stock item is assigned to a Stock Group.
•Stock Groups determine:
•Markup percentages
•Line discounts
•Turnover reporting by group
•When an item is sold, the Stock Group defines the following General Ledger posting accounts:
•Sales Account
•Cost of Sales Account
•Stock Account
•Stock Adjustment Account
Setup Instructions:
1.Go to Stock Groups in the system.
2.Create a new Stock Group for each inventory category.
3.Assign the appropriate GL accounts:
•Cost Account
•Sales Account
•Stock Account
•Stock Adjustment Account
4. When adding or editing a stock item, assign it to the relevant Stock Group.
❖Tip: Accurate setup of Stock Groups ensures that sales, costs, and stock movement are correctly posted and reported.
Hover the mouse over the different fields on the form. If the cursor changes to a hand (![]() ) , click to get more information.
) , click to get more information.
Stock Group Fields - Detail Tab |
|
Maximum Line Discount |
Maximum Line Discount This setting limits the maximum discount that can be applied per line item on invoices, quotes, and other sales documents. You cannot exceed the discount percentage set here for the specific stock group.
See also: Pricing Options & Discount Rules
|
Minimum / Maximum Markup |
If "Use Group Pricing" is selected in the Main Stock Form > Cost and Selling tab, the Minimum and Maximum markup percentage will be retrieved from Stock Groups
Key Points:•Set the markup percentage for both the main stock group and any subgroups. •In Invoice Options, you can allow items to be sold below the minimum markup if needed. •See also: Pricing Options settings. •Under Job Card Extra is a setting "Allow Below Minimum Markup". •This rule also applies to Quotes, Invoices, and Sales Orders
|
Automatic maximum discount |
Automatic maximum discountIf this option is ticked, the system will automatically apply the Maximum Line Discount to all items in this stock group when added to an invoice.
Example: If the Maximum Line Discount for a stock group is set to 10%, every item from that group added to an invoice will automatically receive a 10% discount — no need to apply it manually. |
Months |
Stock Group Months Set this value in the Stock Items > Stock Group Form by ticking the "Months" checkbox.
The number of months entered here will be used to:
•Calculate average sales •Generate sales forecasts in the Purchase Planning Form •Display calculated values in the Inventory Statistics Form
This setting helps ensure that stock planning and forecasting are based on relevant sales history.
Example: If you set Stock Group Months = 6, the system will calculate the average sales and forecast based on the last 6 months' sales for all items in that stock group. This helps ensure your stock planning is based on recent trends.
|
Safety Percentage |
Stock Groups: Safety Percentage You can set a Safety Percentage in the Stock Group Form to automatically increase the minimum suggested stock level by a percentage margin. This helps prevent stock-outs due to fluctuations in demand or supplier delays.
|
Only On Job Card |
When the "Only on Job Card" option is selected for a stock group, the items in that group can only be sold through the Job Card module.
|
Cover Image |
Cover Image for PrestaShop•Cover Image - None / Cover Image - Active This button indicates whether a cover image has been added for the stock group. •Initially labeled "Cover Image - None", it will change to "Cover Image - Active" once an image is added. • •Purpose: The cover image is used as the category/stock group image in PrestaShop.
•To Export the Image to PrestaShop: Make sure to enable the checkbox: ✅ Enable Stock Group / Category Cover Image Export checkbox in the PrestaShop form.
|
Default Item Image |
Default Item Image (PrestaShop Integration)•Default Image - None / Default Item Image - Active: This button shows whether a default image has been set for items without their own images.
•Purpose: When uploading items to PrestaShop, if a stock item does not have its own image, this default image will be used instead.
•Behavior:
•Before setting: The button shows “Default Image - None” •After adding a default image: The button changes to “Default Item Image - Active” |
Extra (Menu Button) |
Deleting Unused Stock GroupsTo remove unused stock groups from the system:
1.Navigate to the Stock Group Form. 2.Click on the Extra menu button at the top of the screen. 3.Select “Delete Unused Groups.”
This function will automatically delete all stock groups that:
•Have no items linked to them. •Are not referenced in pricing or discount rules.
|
Stock Group Columns Explained |
|
Stock account |
You can override the general ledger Stock Account in the Goods Received Note (GRN). To enable this feature, follow these steps: 1) Go to GRN Security Setup and select the 'Allow GL Stock Override'. 2) Go to the Stock Options form. Select the 'Per Line Stock GL Account' and/or the 'Per Line stock GL Account - NSI only'.
Once these settings are enabled, you can find the Stock GL Account column in the GRN to make the necessary changes. |
Count |
Displays the total number of stock items in this stock group. |
Web Count |
Displays the number of stock items marked as "Web Item" in this stock group. (Web Items are synced or displayed on your e-commerce platform.) |
|
|