Watch the videos: Lookups Grid Reports How to email invoices
Hover the mouse over the different menu options. If the cursor changes to a hand ( ), then click to go to the subject.


Invoice Lookup
Go to Invoice > Invoice Lookup
Overview
The Invoice Lookup screen allows you to search, view, manage, analyse, and process existing sales invoices.
It provides a central location for working with invoices, whether you need to print or email documents, check payment status, investigate sales activity, create credit notes, or review customer transaction history.
Key Features
•Search for invoices by customer, document number, date, amount, reference, or date range.
•Print or email individual invoices or multiple invoices in bulk.
•Export invoice information to Excel.
•Monitor unpaid and overdue invoices.
•Analyse sales activity and salesperson performance.
•Monitor invoice discounts and payment status.
•Create credit notes or correct existing invoices.
•View related documents, including Quotes, Sales Orders, and Job Cards.
•Access customer account information and transaction history.
•Attach images and supporting documents to invoices.
Note
By default, the Invoice Lookup displays the latest 1,000 invoices. To display more records, change the Records Per Page setting at the bottom of the form.
Hover the mouse over the different fields on the form. If the cursor changes to a hand () , click to get more information.

Menu Bar Functions On The Invoice Lookup Form |
|
|
Prints the Invoice Lookup screen. Before printing, you can remove unwanted columns and rearrange the remaining columns to suit your requirements. See: Lookup |
Print Analysis |
Analysis – Summary of Data tab is particularly useful for: •Sales summaries •Invoice analysis •Salesperson performance reporting.
|
Export to XLSX |
Exports the Invoice Lookup data to Microsoft Excel.
|
Recalculate Paid |
|
Print Filter |
Displays invoices that cannot currently be emailed, for example, because the customer does not have a suitable email address configured.
|
Email Filter |
Displays invoices that can be emailed.
Use the Emailable column to identify invoices that meet the email requirements.
|


Bulk Actions in Invoice Lookup.Invoice Lookup allows you to perform several actions on multiple invoices simultaneously. Selecting Invoices
1. Use the checkbox on the left-hand side of each invoice to select individual records. 2. Alternatively, apply filters to narrow down the list. 3.Click Select All to select all invoices in the filtered results.
Once invoices have been selected, the following actions become available. With selected: |
Prints all selected invoices.
|
Email DirectSends multiple invoices to multiple customers simultaneously. Each invoice is emailed individually to the relevant customer using your configured email server.
Email Message Setup
The default email message is configured under: Invoice > Invoice Options > Email tab. Invoice > Invoice Options > Email tab.
The following substitutions are available: •Company Name •Document Number •Customer Name
Limitations: •❌ No additional Attachments can be made. •✅ Email setup required under: Company > Application Options > Email.
|
Email ComposeEmail Compose provides more advanced email functionality and allows you to send multiple invoices to multiple customers. Each invoice is sent individually to the relevant customer. Key Features:
•Select and use saved email templates. •Customise the email message. •Use up to 16 available substitutions, including: •Tracking Number. •Sales Order Number. •Invoice Number. •Invoice Date. •And more. •Add additional attachments. •Import and send pre-designed HTML email templates. •Automatically attach the invoice using the {invoice_attachment} substitution.
Setup Required: Company > Application Options > Email.
Tip: Email Compose is particularly useful when sending professional, customised invoice emails with additional documents or attachments.
View Sent Emails To view or manage emails sent through Smart-IT, go to: Company > SI Emails > Sent Emails
|
Attach to EmailSends multiple invoices to a single customer as attachments. Behavior depends on your settings in Company > Application Options > Email:
Option 1: Use Outlook if Available When enabled: • Opens Outlook with all selected documents attached. • Emails sent through Outlook are saved in your Outlook Sent Items folder.
Option 2: Use SI Send Email Instead of Default Email Program When enabled: • Emails are sent via your SMTP server. • Not saved in your Sent folder.
•Enable Sent – Save Copy in Sent Folder checkbox. •Make sure your Mailbox is set up via the Mailbox Setup button.
Important: Only select invoices that belong to the same customer for this action.
If “Sent – Add to Sent Log” is enabled, the email is recorded in the Sent Log.
View or delete logged emails under: Company > SI Emails > Sent Emails.
|
Export SIEExports the selected invoices in Smart-IT's SIE format to your computer.
These files can be imported directly into another Smart-IT system using the Goods Receive Notes (GRN) module.
This is useful when transferring invoices between Smart-IT installations.
|
Export PDF'sSaves each selected invoice as a separate PDF file to your computer. |
Credit NoteCreates multiple credit notes from the selected invoices.
|

Right-click actions available on the Invoice Lookup.Right-clicking an invoice in Invoice Lookup provides access to additional functions. These shortcuts make it easier to work with existing invoices without navigating through the main menus. |
|
New Credit Note For This Invoice |
Creates a credit note linked to the selected invoice. |
Correct Change Invoice |
1.Select Correct/Change Invoice. 2.Modify the necessary details, then click Change to apply the corrections. See Invoice Correction for detailed instructions. |
Receive Customer Payment |
Opens the Receive Payment screen, where you can capture and allocate a payment against the customer account. |
New Invoice Based On This Invoice |
New Invoice Based On This Invoice Creates a new invoice using an existing invoice as a template.
How to use: Go to: Invoice > Invoice Lookup
1.Right-click the required invoice. 2.Select New Invoice Based on This Invoice. 3.Smart-IT copies the original invoice's item lines and details into a new invoice. 4.Make any necessary changes, such as quantities, prices, or customer information. 5.Process the new invoice.
Tip: This is particularly useful for recurring or similar customer orders, as it saves time and avoids capturing the same information again.
|
Print Delivery Note |
Print or email the delivery note |
Collect |
Collect Opens the Invoice Stock Collection screen.
This module is used when a customer has purchased goods but will collect them in portions or at a later date.
See: Invoice > Extra > Invoice Stock Collection.
|
Invoice Label |
Prints an invoice label or shipping label. |
Reprint Invoice |
Reprints an existing invoice. How to use: •Go to: Invoice > Invoice Lookup •Right-click on the required invoice. •Select Reprint Invoice |
Print Preview Email Invoice |
Allows you to preview the invoice before printing or emailing it.
|
Open Customer Form |
Opens the customer's main form.
|
Open Job Card |
Opens the related Job Card if the invoice originated from a Job Card.
|
Open Recurring Invoice |
Opens the related Recurring Invoice if the invoice originated from a Recurring Invoice.
|
Open Quote |
Opens the related Quote if the invoice originated from a Quote.
|
Open Sales Order |
Opens the related Sales Order if the invoice originated from a Sales Order. |
Export |
Exports the invoice in Smart-IT's SIE format. Another Smart-IT user can import the exported invoice directly into their GRN module.
|
Copy To Clipboard |
Copies the Invoice Number or Audit Number to the clipboard. You can then paste the copied information into other Detail or Lookup forms.
|
Invoice Lookup ColumnsMost columns in Invoice Lookup are self-explanatory. The following columns provide additional functionality and are particularly useful for filtering, reporting, and analysing invoice information.
|
|
COD |
Cash on Delivery (COD) ColumnThe COD column identifies customers who have collected or received goods but have not yet paid.
This can be useful in situations where:
1.A serviced item is delivered, but the customer refuses to pay. 2.An account is created to speed up checkout, but the customer leaves without paying.
You can: •Identify unpaid cash customers in the Age Analysis cash column. •Identify COD customers using the COD column in Invoice Lookup. •Set the COD option on the Customer Main Form.
Note: The invoice due date for a COD customer is automatically set to the invoice date.
|
Customer Rep |
Displays the salesperson linked to the customer on the Customer Main Form.
This can be compared with the Rep column to identify differences between the customer's assigned representative and the salesperson recorded on the invoice. |
Discount Amount and % |
Discount Amount and Discount %Displays the discount amount and percentage applied to the invoice.
Common Uses: •Monitor discounting activity. •Analyse discounts given by individual salespeople. •Audit pricing adjustments. •Identify invoices with unusually high discounts.
|
Edit Date |
Edit DateDisplays the System Date and System Time when the invoice was last edited. By comparing the Date and Edit Date columns, you can identify invoices that were edited on a different date from their original invoice date.Important: Changes made on the same day as the original invoice date will not necessarily be identified by comparing these dates alone.
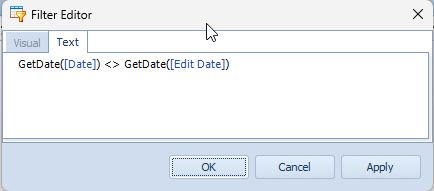
Identifying Invoices Edited on a Different DateYou can use the Edit Filter to display invoices where the invoice date differs from the edit date.
1. Open the Invoice Lookup form.2. Open Edit Filter.3. Select the Text tab.4. Enter the following expression:GetDate([Date]) <> GetDate([Edit Date])5. Apply the filter.How the Filter Works•GetDate([Date]) returns the invoice date without the time component. •GetDate([Edit Date]) returns the edit date without the time component. •<> means not equal to. The filter displays invoices where the invoice date and edit date are different.
|
Emailable |
EmailableIndicates whether the invoice can be emailed from the Invoice Lookup screen.
A checkmark appears when both of the following conditions are met: 1. The customer has a valid email address. 2. The Invoice option is enabled under: Customer > Contacts & Address Tab Common Uses: •Filter invoices ready for emailing. •Identify customers missing email setup. •Bulk email invoice processing.
|
Image |
ImageAllows you to link images or supporting documents to an invoice. To add an image:Double-click the Add Button in the Image column. Common Uses •Attach signed documents. •Store proof of delivery. •Save supporting paperwork. •Link customer documentation.
|
Invoice Payment Balance |
Invoice Payment BalanceDisplays the outstanding balance on each invoice.
Common Uses: •Identify unpaid invoices. •Monitor partially paid invoices. •Identify outstanding customer balances.
|
Job Card Number |
Displays the related Job Card Number if the invoice originated from a Job Card. Common Uses: •Trace workshop invoices •Open linked job card records •Analyze workshop billing
|
Paid By |
Identifies invoices paid by a third party, such as a Head Office on behalf of another customer.
See Also: Paid By - Customer Financial tab.
|
Payments Due |
Payments DueInvoices with overdue payments are displayed in red.
The payment due date is configured under: Invoice > Payment Tab Common Uses: •Identify overdue invoices •Follow up on unpaid customers •Monitor credit control
|
Quote Number |
Quote NumberDisplays the related Quote Number when an invoice originated from a quotation. Common Uses •Track quote-to-invoice conversions. •Analyze quote success rates. •Open linked quotations.
|
Recurring Invoice |
Recurring InvoiceDisplays the Recurring Invoice Number when an invoice was generated from a Recurring Invoice. Double-click the recurring invoice number to open the linked recurring invoice setup.
Tip: Analysing Standard Sales Without Recurring Invoices If you want to analyse sales per salesperson while excluding recurring invoices: 1.Open Invoice Lookup. 2.Apply a filter to the Recurring Invoice column. 3.Display only records where the Recurring Invoice field is blank.
This ensures that only standard invoices are included in the sales analysis.
Common Uses: •Identify automatically generated invoices. •Track recurring billing customers. •Open recurring invoice templates.
|
Rep |
Salesperson (Representative)By default, the Salesperson (Rep) assigned to an invoice is the currently logged-in employee. You can change this behaviour under Invoice Options > General to automatically assign the salesperson specified in the customer's profile instead.
Security RestrictionsA security setting is available to prevent users from changing the salesperson assigned to an invoice.
Checking Whether the Salesperson Was Changed
To determine whether the salesperson on an invoice differs from the salesperson assigned to the customer:
1. Open Invoice Lookup. 2. Compare the Rep column with the Customer Rep column.
If the two values differ, the salesperson assigned to the invoice differs from the representative recorded on the customer's profile.
|
Sales Order Number |
Sales Order NumberDisplays the related Sales Order Number when an invoice originated from a Sales Order. Common Uses: •Trace order processing history. •Verify the sales workflow. •Link invoices to their original Sales Orders.
|
Send Email Date |
Send Email DateDisplays the date the invoice was emailed from the:Invoice Lookup Form Common Uses: •Verify invoice delivery •Track customer communication •Identify invoices not yet emailed
|
Type (Cash vs On Account) |
Type (Cash vs On Account)Indicates whether the invoice was processed as: •Cash Sale •On Account Common Uses: •Separate cash and account sales •Analyze customer credit activity •Financial reporting
|
Payment Due Date Options in Smart-It
Smart-IT provides several methods for calculating invoice due dates.
Option 1: Based on Payment Terms
This is the default method.
The due date is calculated by adding the customer's Payment Terms to the invoice date.
Example:
•Invoice Date: 5 May
•Payment Terms: 30 days
•Due Date: 4 June
Option 2: Statement Date Method (Recommended)
Go to Invoice > Invoice Options >General tab.
Enable Calculate Due Date From Statement Date (End of Month).
Example:
•Invoice Date: 5 May
•End of Invoice Month: 31 May
•Add 1 day: 1 June
•Payment Terms: 14 days
•Resulting Due Date: 15 June
This method is useful for businesses that base payment dates on monthly statements.
Option 3: Fixed Day of the Month
You can configure an automatic invoice due date based on a fixed calendar day each month.
Go to: Customer Form > Credit Control tab.
Setup:
Enter required day in the Salary Payday field.
Example:
If you enter 7, the due date will be set to the 7th of the month.
Option 4: Manual Override
You can manually change the due date while creating an invoice.
1.Open the invoice.
2.Go to the Customer / More tab.
3.Edit the Due Date field.
Viewing Due Invoices
Invoice Lookup allows you to view and filter invoices according to their payment due dates.
The Age Analysis Analysis report also includes a Due column, which displays a summary of outstanding amounts per customer.
Performance and Sales Reports Using Invoice Lookup
The Invoice Lookup screen can be used to create useful sales and management reports by applying filters, sorting, grouping, and analysis.
The following examples illustrate some practical applications.
Sales Performance Reports
1. Invoices Below a Certain Amount
•Filter invoices below a specified value, for example R20.
•You can also filter by date and salesperson.
Use the Analysis Tab to review Sales per Salesperson.
2. Invoices with High Discount Percentages
Filter invoices where the discount percentage, for example, is greater than 10%.
Use: Monitor discounting practices and identify sales requiring management attention.
3. Today's Invoices
Filter the Date column to display only invoices processed today.
Use: Review daily invoicing activity.
4. This Week’s Invoices
Filter the Date column using options such as Is This Week.
You can also use Is Yesterday when reviewing the previous day's invoices.
Use: Monitor weekly sales activity.
Payment and Credit Control Reports
5. Credit Notes Only
Filter the invoice list to display only credit notes.
Use: Review credit activity and returns.
6. Unpaid Invoices
Use the Due Date column to filter unpaid entries.
7. Invoices Not Emailed This Month
Use the Send Email Date column to identify invoices that have not been emailed during the current month.
Use: Ensure that invoices are distributed to customers.
8. Invoices That Cannot Be Mailed
Filter the Emailable column to identify invoices that do not meet the email requirements.
Use: Identify missing email addresses or incorrect customer email settings.
9. Credit Notes by Salesperson
Group or analyse credit notes according to the Rep column.
Use: Monitor credit note activity per salesperson.
Document Control Reports
10. Invoices From Quotes or Job Cards
Use the Quote Number and Job Card Number columns to filter invoices according to their source documents.
Use:
•Monitor Quote-to-Invoice conversions.
•Review workshop invoices.
•Trace the source of sales transactions.
11. Unpaid Invoices Not Signed
Apply the following filters:
•Paid = No
•Signed = No
Use: Identify unpaid invoices that have not been signed, helping management monitor sales documentation and follow-up procedures.
Management Tip
Invoice Lookup is more than just a screen for finding invoices. With its filtering, grouping, analysis, and export functions, it can also be used as a powerful management tool.
By combining the available columns and filters, management can monitor sales performance, discounts, outstanding payments, salesperson activity, and document control without having to run multiple separate reports.
FAQ
Q: Why can I only see the last 1,000 invoices?
A: By default, Invoice Lookup displays the latest 1,000 invoices.
To display more invoices, change the Records Per Page setting at the bottom of the Invoice Lookup screen.
Q: Not all the invoices are shown?
A: By default, Invoice Lookup displays the latest 1,000 invoices.
To display more invoices, change the Records Per Page setting at the bottom of the Invoice Lookup screen.