Lookup |
Top Previous Next |
Lookup Forms
You can create your own spreadsheets, charts, and reports by organizing data with filtering, sorting, and grouping using lookup or detail forms.
Watch the following videos: |
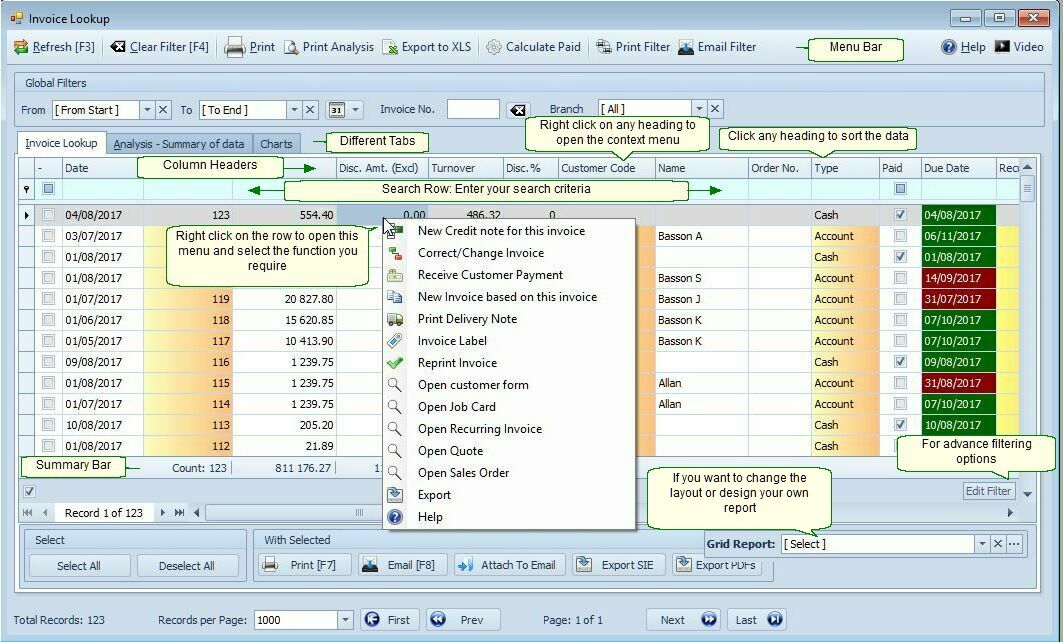
To explain a lookup form, we are going to use the invoice lookup form as an example.
Please note that if you hover your mouse over certain parts of the form below, the cursor (![]() ) will change to a hand (
) will change to a hand (![]() ). Click to get specific help on that part of the form.
). Click to get specific help on that part of the form.

Sort Columns: Click on the header buttons (e.g., Date, Supplier Name, etc.) to sort the data in ascending or descending order.
|
Sort Multiple Columns: To sort by more than one column at the same time, hold down the Shift key while clicking on additional column headers.
|
Move Columns: To rearrange columns, click and drag the column headers to your desired position.
|
Resize Columns: To adjust the column width, drag the column-resizing cursor left or right right. |
Filter Row Explained |
Search for Specific Data: Type your search criteria in the blue filter row located just beneath the column headings. Advanced Filtering: For more advanced filtering options, refer to Edit Filter.
|
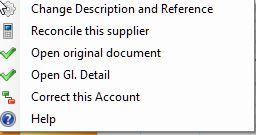
Double click coloured columns to do specific tasks. |
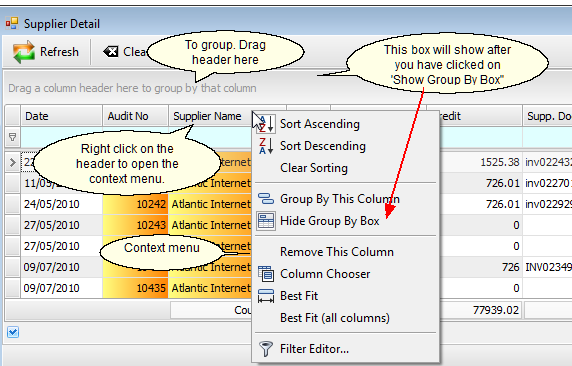
Right-click on the header button.
The right-click context menu will open. See image below.

The Header Row Context Menu (Right-click) -- Explained |
|
Sort Ascending / Descending. |
Select this option to sort your data in ascending ((A → Z or 0 → 9)) or descending ( (Z → A or 9 → 0) order.
|
Show Group By Box / Hide Group By Box) |
Show Group By Box / Hide Group By Box Toggle the Group By Box on or off.
•Drag any column (e.g. Customer Name) into the Group By Box to group the data by that field. •To remove grouping, drag the header back to the main row.
Tip: Great for summarizing large datasets.
|
Remove this Column. |
Hide unnecessary columns (customize the columns displayed):
1.Right-click a column heading. 2.Click Remove This Column.
✓To restore it:
•Use the Column Chooser (see below), or •Close and reopen the form to reset the layout.
|
Re-insert hidden or missing columns (Adding columns to a grid):
1.Right-click any column header. 2.Click Column Chooser. 3.Drag the desired column back into the grid.
❖ Handy for customizing what data you see
Adding columns to a grid
|
|
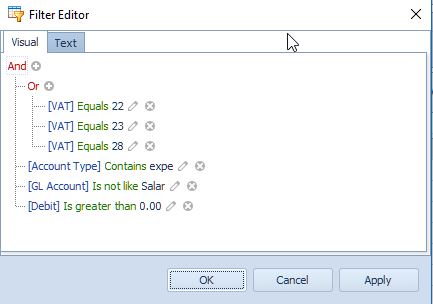
Filter Editor |
The Filter Editor dialog allows users to build filter criteria of varying complexity using either: oThe tree-like filter builder interface oA text editor
To open the Filter Editor, you can also click the Edit Filter button, typically located just above the horizontal scroll bar on the right side of the lookup form.
|
Note:
The report keeps the adjusted column settings only as long as you have the report open. If you want to save your settings, use the Grid Report.
See also the Developer Express: Filter Editor tutorial.


