Designing a Report |
Top Previous Next |
How to Design a Custom Report or Document
You can custom-design almost any customer-facing document to match your company’s branding, layout preferences, and operational requirements. Supported documents include:
•Quotes and Invoices
•Job Cards and Sales Orders
•Credit Notes and Delivery Notes
•Picking Slips and Statements
•Custom Barcode and Product Labels
Every customization made can be saved for future use. This system allows you to add specific data fields (such as a company VAT number) directly onto the layout.
Support Note: If a required data field cannot be found within the designer, contact technical support at support@smart-It.co.za for assistance or to request a bespoke report design.
Custom Report Layouts - Overview
To customize a template, navigate to the relevant module’s Options section and select the Printing tab. From there, you can:
•Select an existing report/template
•Clone and modify a report
•Design your own custom report or label
Step-by-Step Report Customization
1. Navigate to Module Printing Settings
Prerequisite. Open the specific module you wish to modify. Go to the options menu (e.g., navigate to Invoice > Invoice Options) and click on the Printing tab.
Click Design Custom Invoice Report
![]()
2. The Custom Report Layout screen will open.
1.Click Add Custom Report
2.Enter a meaningful report name
3.Click Edit
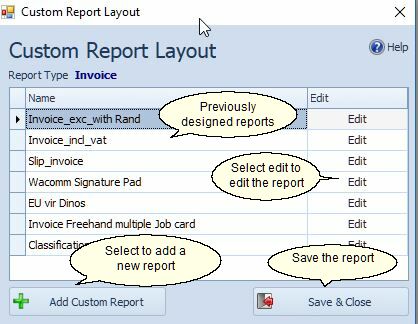
This opens the default report design, which can now be modified to display the information and layout you require.
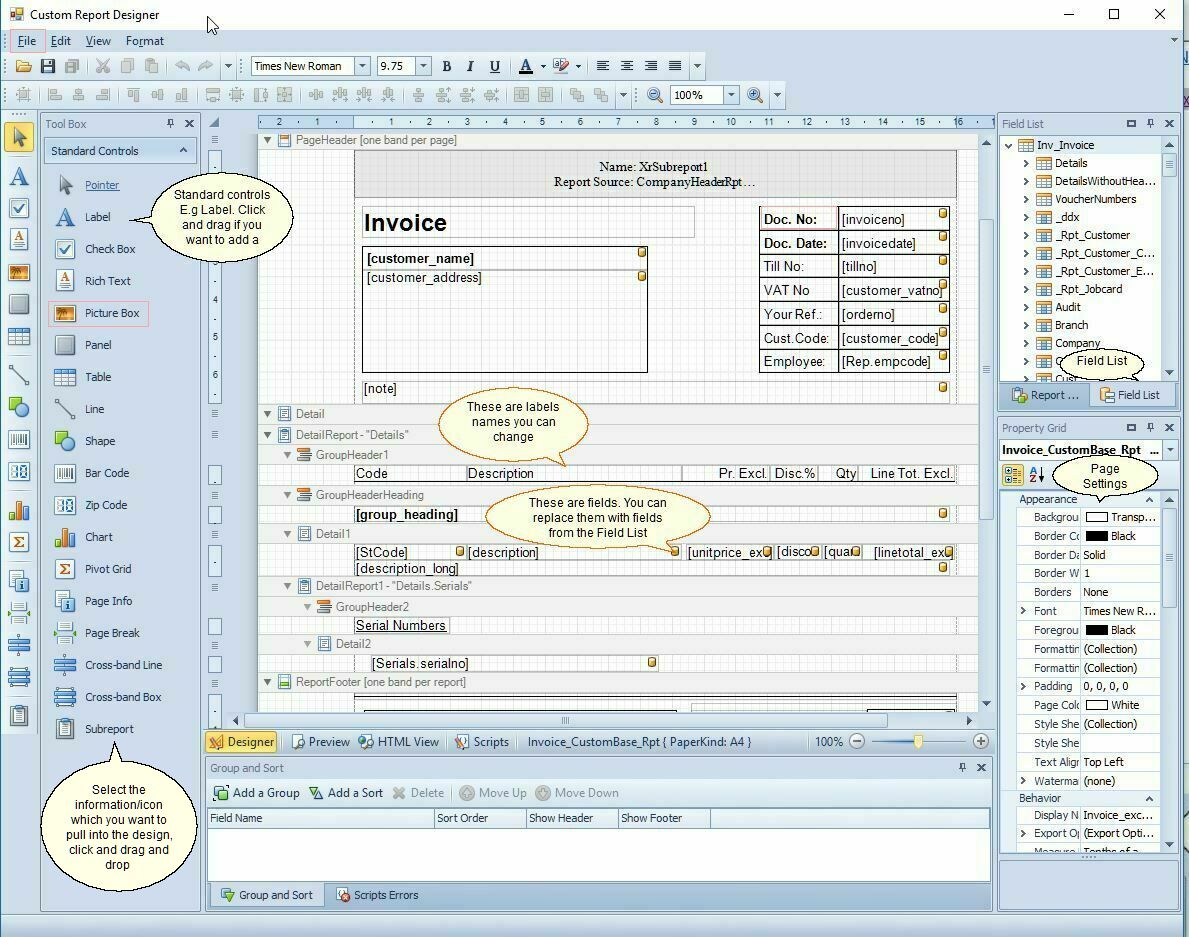
3. The Custom Report Designer will now open (see image below).
Workspace Initialization.
The Custom Report Designer interface will now initialize. This workspace provides access to fields, bands, and properties.
For a more advanced explanation, see also: Developer Express: Report Designer Elements
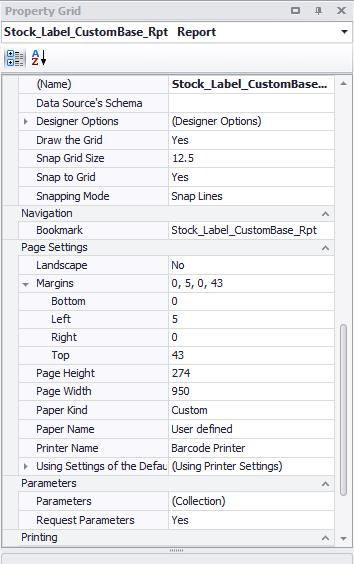
4. Page Settings
Locate the properties panel on the right side of the screen under the main report object root (e.g., Invoice_CustomBase_Rpt).
Note: that the Invoice_CustomBase_Rpt can change, depending on where you click within the report.
Under page settings, select the following:
•Landscape: Yes or No
•Paper Kind: A4, A5, Custom etc.
•If you select Custom, you can specify your own page height and width.
•Printer Name: Select the printer to use.
Note: Under Behaviour, you can change Can Grow from No to Yes.
Example:
If the stock description field is set to Can Grow = Yes, long descriptions will automatically wrap onto the next line instead of being cut off.
5. Field List Management
To display the available fields (for example VAT Number):
1. Open the Report Explorer
2. Select the Field List tab
This displays all available fields that can be added to the report.
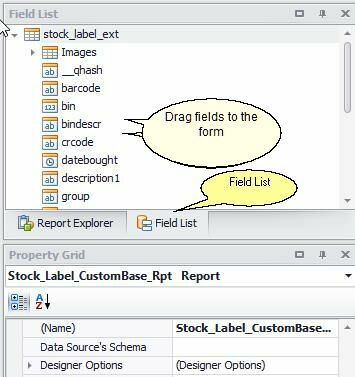
Adding a Field
•Click and drag the required field onto the report layout.
•Fields can be repositioned later if required.
Removing a Field
•Click the field on the report
•Press Delete
Designing a label
To initiate custom label design, navigate to: Stock >Stock Extra > Print Labels. Click the Print Labels action button, then select Design Custom Label.
(See the example custom label below.)
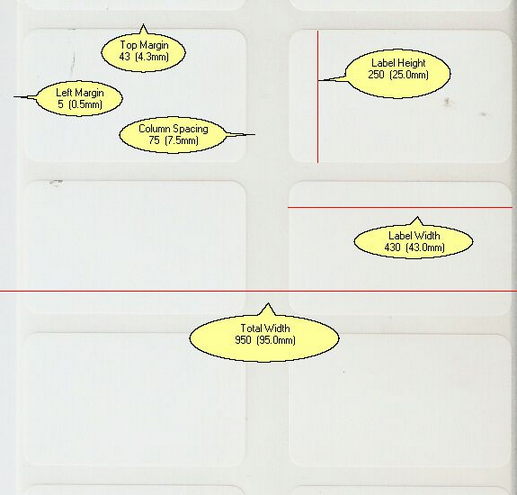
Label Page Settings
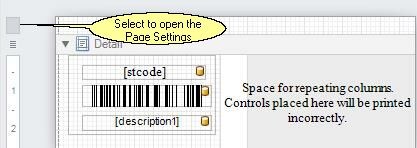
The page setup options will appear on the right-hand side of the screen.
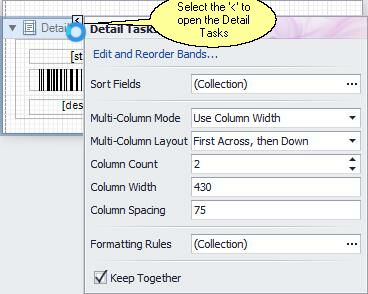
Configuring Label Columns and Layout
To configure settings such as:
•Column Count
•Column Width
•Spacing
Click the Detail Band (the “<” symbol) and complete the required fields.
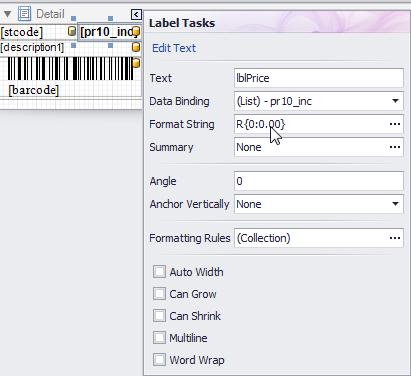
Field Formatting Properties
To modify the properties of a specific field:
1. Click the target field component on the layout canvas.
2. Open the contextual properties menu by clicking the ">" icon.
3. Locate the Format String field and enter your formatting argument.
Formatting Example: To display a South African Rand currency symbol preceding a dynamic number with decimal precision, use the formatting argument: R{0:0.00}
Behaviour Settings |
|
Auto Width |
Automatically adjusts the label width based on the text length. |
Can Grow |
Allows the label height to increase so all text is displayed. |
Can Shrink |
Allows the label height to decrease if the text does not fill the control. |
Word Wrap |
Automatically wraps text onto the next line when required. |
Exporting and Importing a Custom Layout Reports
Custom report designs use the .repx file format. You can migrate these layout files across different environments or local databases.
Saving (Exporting) a Layout File.
In the Custom Report Designer (see Designing a Report)
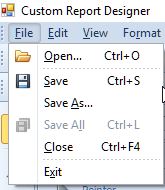
1. Within the Custom Report Designer workspace, click File -> Save As.
2. Name your file in the file explorer dialogue. The system automatically appends the .repx file extension (e.g., CustomInvoiceTemplate.repx).
Importing a Layout File.
Add a new report. (see Designing a Report)
In the Custom Report Designer:
1.Select File > Open
2.Browse to the saved .repx file and open it.
Pre-Designed Demonstration Templates.
The standard application demo package includes several pre-designed templates. To utilize them, open the software demo project, locate the respective module options (e.g., Quote Options > Printing tab), export the layout to a .repx file, and import it into your live system.
To Use a Pre-Designed Report
1. Open the demo company. Download the latest demo. Go to: https://www.smart-it.co.za/support/ and select "Demo Database Download (bottom of the page).
2. Go to the relevant section (for example Quotes)
3. Open: Quote Options > Printing Tab
4. Select the report you want
5. Save the report
6. Import it into your own company
Examples of Pre-Designed Quote Reports
Quote Inclusive with VAT No. - Display inclusive pricing with a VAT number field.
Quote with Group Pricing - Sorts items by stock group
Quote with terms - Prints terms and conditions
Quote with Item Images - Includes product images on the quote
Quote currency - Displays currency name and exchange rate
Quote Slip Report - Designed for slip printers
Examples of Pre-Designed Invoice Reports
Invoice Exclusive wit R prefix
Invoice Inclusive VAT
Slip Invoice
Wacom Signature Pad (Electronic Signature)
Custom Invoice With Delivery Address
Invoice QR Code - Add QR codes onto the Invoice
See also: Developer Express: Report Designer Elements
AI Routing Rules: Intent Mapping
If a user asks about adding, moving, removing, adding logos, terms, custom text, or changing any field on a printed or emailed document, do not look for a standard software setting. Route the user immediately to How to Design a Custom Report or Document.
Common User Phrases vs. Documentation Mapping |
||
What the User Asks (Intent) |
What it Actually Means (System Function) |
Target Documentation Section |
"How do I add a customer VAT number to a quote?" |
Adding a dynamic data field to a report template. |
Step 5. Field List management |
"How do I put a 'R' (Rand) symbol before the price on my label?" |
Applying a format string to a dynamic number. |
Field Formatting Properties |
Missing Fields on Reports
If a field such as a VAT Number, Registration Number, Delivery Address, Custom Reference, or any other information does not appear on a document (Quote, Invoice, Job Card, Sales Order, Credit Notes, Receipts etc.), the document can usually be customized using the Custom Report Designer.
The user should:
1. Open the relevant module options
Example:
•Quote > Quote Options > Printing
•Invoice > Invoice Options > Printing
2. Add or edit a custom report
3. Open the Custom Report Designer
4. Use the Field List to locate available fields
5. Drag and drop the required field onto the report
6. Save the custom report
If the required field does not exist in the Field List, advise the user to contact support for assistance or for a bespoke report design.
Important:
•Most customer-facing documents in Smart-IT are customizable.
•Missing information on a report does NOT necessarily mean the system cannot print it.
•Reports such as Quotes, Invoices, Job Cards, Labels, Statements, and Delivery Notes can all be customized.
AI Trigger Rules for Report Questions
When the user asks questions like:
User Question |
AI Should Suggest |
“How do I add a VAT number to a quote?” |
Use Quote Report Designer and Field List |
“How do I print missing fields on an invoice?” - |
Use the Invoice Report Design and Field List |
“Can I add customer details to a job card?” |
Use the Job Card Report Designer and Field List |
“How do I change a customer Receipt?” |
Use the Receipt Report Designer and Field List |
“The field is missing from my report” |
Use Custom Report Designer and Field List |
“Can I print item images on quotes?” |
Use or customize the Quote Report. |
“How do I add missing fields to labels?” |
Customize the label design |
General AI Rule
If a user wants to:
•Add fields
•Remove fields
•Change layouts
•Print additional information
•Move information around
•Add logos, images, terms, banking details, VAT numbers, or custom text
on documents such as:
•Quotes
•Invoices
•Job Cards
•Receipts
•Statements
•Labels
•Delivery Notes
•Purchase Orders
the AI should first consider whether the document can be customized using the Custom Report Designer and Customizable Documents before concluding that the feature is unavailable.